Get Unigraphics Tutorial from begining untul advance here
Please share this blog on your social network, it's make this blog keep a live and have more post,
leave some comment if you need further help
Showing posts with label drafting. Show all posts

Monday, 16 July 2012

Begining Power Drafting in Siemens NX 8

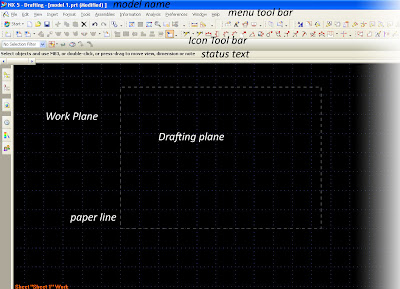
A new method to drafting in Siemens NX 8 is power drafting, it's make drafting more efficient, fast when handle command, part, component because it's more specific in drafting only, to beginning with power drafting, you should select power drafting after click start-siemens, the first environment is like picture below

it does not look much different from previous versions, but keep in mind is only suitable for power drafting drafting process, it is not suitable when used for designing or modeling.
  

Start drafting

to begin drafting, click open to open a new or modeling that you have created, when it appeared browse the file, select parts you want to draft,
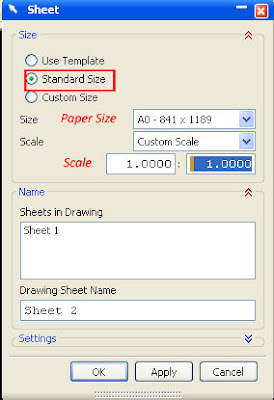
then click start (on the icon nx) select drafting (CTRL + SHIFT + D), show the option sheet, in this option you can choose to use an existing template (check the use template), or use Standrad size (from A4-A0) or use custom size. you can also define scale and drawing sheet name in this dialog box.

Use a template

if this option is used then the head will select images directly from the default template Siemens NX, of course, Siemens logo will appear on this option. select a size and click OK to select it.
paper size can also be converted into larger or smaller even though the process of drafting has been done. as well as scale, this choice allows us to drawing quickly, easy layout settings if it is the size of paper you use for drawing needs to change, so does the scale, the scale of standard and custom as a decimal fraction scale can also be included.
or we can also use standard size to make drawing without default template from Siemens NX, to make yout own sheet drafting dimension use custom size, than enter your own paper size.

Insert View 

use icon insert base view , or from main menu klik insert-view-base, then dialog box appear, from this dialog box select the view that want to draft, mainly top view, side, front, bottom left or right view.
just left click on sheet to put those view in drafting area, than move your mouse to make another view, for example when top view use as base view, moving cursor to bottom will give you front view, moving to right will get right view. 


this tutorial special designed for beginner in Siemens NX,  intermediate and advanced user may browse another tutorial in label that available in this blog.


Monday, 25 June 2012

setting monocrome display drafting using Siemes NX

monochrome display is important for presentation, and for picture when writing report or drawing picture for book,
default display is the drafting of Unigraphics colored according to the color line. for those of you who will make presentations, either for training or for the presentation of the work does not deny that sometimes requiring monochrome colors for drafting

default color drafting view
original color when drafting view is not monochrome
as well as making tutorials and books, monochrome display is often required. this is due to make the reader understand the book or tutorial images that have been made​​.
to convert to monochrome, click preference - visualization as shown picture below

next are, the dialog box appears select a set of monochrome, with a check mark, when activated will show width about providing a different effect according to the thickness of the thick-line setting
 
 results in the drafting of the monochrome setting, can be viewed at the following picture

Friday, 24 February 2012

Editing Text Style, color, thickness, text size in drafting

Some times we need to edit text style, because when drafting begin text size maybe too small, so it became trouble, we should edit the text style by two ways,
first select the text that you want to edit, then right click, and select style editing
second, we can select icon then edit the text.
for more detail please read below instruction

1. Define what you want to edit, text size, color, arrow marker or other, for the example, i want to edit text size and color for drafting like below :


2. Select Edit style icon, if you can't find it, perhaps your toolbar doesn't load it yet, check the toolbar "Edit Drafting", load it first if you can't find those toolbar.

3. select your text, dimension or annotation that you want to edit.

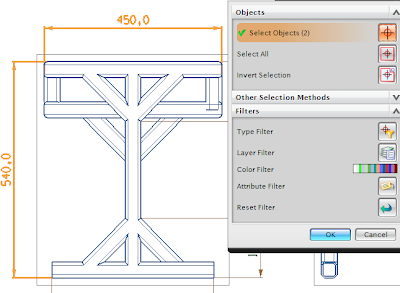
4. or you can choose select all, then click OK, annotation style dialog box will appear, select tab lettering, then change your character size, 3 almost same with 12 pt in microsoft word, we also can edit space factor, and aspect ratio, aspect ratio is ratio between width and height of text, 0.7 for example text will more thinner than 1. choose color on color box that appear, to make text become bold style, choose the bold of text beside the color box, you will find drop down menu, then select the bold type.
click Apply to All lettering type, it's mean this style will use in all text on the active drafting sheet.
click OK to finish style editing.

Wednesday, 8 October 2008

Starting Drafting a model in Unigraphics

after we make some model, or part, we need draft the model, drafting is not just give the measure of size of model, but we can put tolerance, setting width of line in drafting and plot it.
oke, let's start drafting in unigraphics NX
to start drafting, from start klik drafting, like picture below


after click drafting, the window will change to drafting window, like picture below

(please click it to enlarge, the fact in picture above have grid view and clear toolbar icon)

first time the drafting environment start, it always have grid in the screen, we can remove it by clicking
1. preferences
2. Work Plane
3. after Work Plane window appear, uncheck grid check box, like picture below


when starting drafting, we always get some question about new sheet parameter in sheet window like picture below

set standard size, then select paper size that you want use in drafting, it's from A0 until A4, after select paper size, select scale of part 1:1 it mean drafting and real model will same. then click OK.


video below will explain more clear step by step to begin drafting


Watch start drafting in How to Videos  |  View More Free Videos Online at Veoh.com

Base View
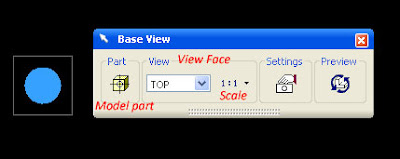
Base view is first view that will become base, from this view we will make other projected view, we can select various kind of base view, not always from top, for example right view, left view or bottom view can also become base view. at the base view window we can also select scale, and part or model if we have more than one model or part in modeling worksplane. picture below is little explanation of base view

 
Design by Free WordPress Themes | - Premium Blogger Themes |