Get Unigraphics Tutorial from begining untul advance here
Please share this blog on your social network, it's make this blog keep a live and have more post,
leave some comment if you need further help
Showing posts with label offset. Show all posts

Tuesday, 20 December 2011

Syncronous Modeling : Using Offset Face

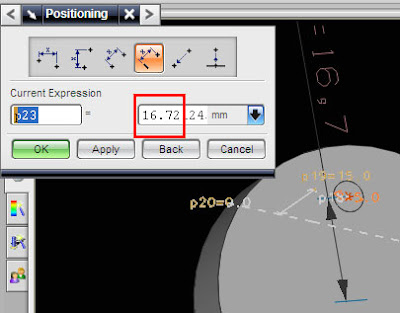
By this order not only face with straight shape, but this command also can use for diameter, radius, etc

when the form object in the offset is the radius or chamfer, and the offset direction leads to one side, then the radius or chamfer can be delete automatically.
Step : click the icon, select the face, and enter the value, or drag the green arrow, then click OK or Apply


Saturday, 9 August 2008

making Block from Block, offset ediitng , Replace face

video tutorial below i make special for beginner, make block from block before or the datum reference is previous block, it's will help to design some part that use block or plate often, like mold / mould base, casting mold, injection mold and other's.

the basic step is like tutorial before, see at http://ugs-tutor.blogspot.com/2008/06/basic-block-using-two-point-and-height.html
yes.. it's basically same, the different is point that we must selected, then the editing after we make the block.

see the video below

Online Videos by Veoh.com

Editing Process
below some editing that i use in those video

Replace Face
use this icon to activated replace face.


after you click those icon, the dialog box will appear, first selection, select the face that you want edit, second button selection is for reference face that you wanted. first face will same with the second face position.
it's fast way to edit face than we fill some value.


Offset Editing
to learn step by step to offset editing you can look at previous post
http://ugs-tutor.blogspot.com/search/label/offset


use the icon like picture below to activated offset operation

Tuesday, 5 August 2008

Transparent the object,offset same region, move together in Unigraphics (UGS NX)

at this post below we can learn how to make objects become transparent so we can look the inside of those object, than how to move together a face using offset region.

Transparent an Object
it's cool and sometimes important to make an object become transparent, becouse sometimes we need to look the object in inside the other object more detail.
picture below shown an object with transparent view.


at those sample picture we can see the inside of same object using transparent.
tho make object transparent, you can click object display icon, or by short cut CTLR+J, after that the class selection window will appear


click the object or part, then click OK, or press center button of your mouse. then change the translucency value more than 0,


then click APPLY or OK
or see the complete video tutorial below

Online Videos by Veoh.com

at those video you can also learn how to move face together more than one object or parts. it's simple, just use offset icon then select together the face that want to move, enter the value then click OK.

 
Design by Free WordPress Themes | - Premium Blogger Themes |