Get Unigraphics Tutorial from begining untul advance here
Please share this blog on your social network, it's make this blog keep a live and have more post,
leave some comment if you need further help

Friday, 14 November 2008

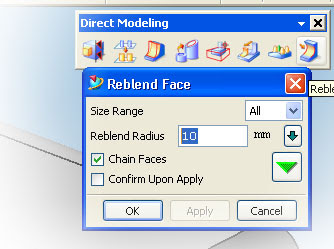
reblend face using direct modeling feature

direct modeling that provide by Unigraphics is very help full, specially when the part parameter was removed, so we can edit it directly by clicking the parameter, but using direct modeling feature we can edit it directly.

face that was blend by certain radius value also can edit by using reblend face feature in direct modeling, to begin those feature
1. click reblend face, rebled face dialog box will appear
2. select blend part of the product or part
3. change the value
4. click Apply or OK


see picture below


i also publish video using veoh.com
see tutorial video below

Watch reblend face in How to Videos  |  View More Free Videos Online at Veoh.com

Make same face using replace face feature

this is one from various feature of direct modeling, this command available from Unigraphics NX1 until Unigraphics NX6, the function of this command is make same flat or same position of face that have different hight,
in the direct modeling feature, Unigraphics give us to editing face and solid model directly like change diameter of cylinder, or arch face, change radius of blend directly and others although the part parameter is removed.

to begin direct replace face command click the picture like below


after dialog box appear select the face that you want to move, select third button then select the target face, click OK or Apply
to make tutorial more easy to understand i post video, hope this useful

Watch direct modeling replace face in How to Videos  |  View More Free Videos Online at Veoh.com

other tutorial also available in the post
http://ugs-tutor.blogspot.com/2008/08/making-block-from-block-offset-ediitng.html
 
Design by Free WordPress Themes | - Premium Blogger Themes |